Friday, August 31, 2012

A clean bathroom doesn't have to be a chore


One of the most dreaded areas in a home to clean is the bathroom. Many people hate to think about the scrubbing and scouring associated with cleaning your tub and toilet. Here is the way we, here at Clean Right Company, clean a bathroom. It streamlines the process so you are using less energy and letting the cleaning agents do most of the work for you.


First, here's a list of supplies you are going to need:

  1. Abrasive cleaner with a bleaching agent -something like Comet.
  2. Disinfecting cleaner
  3. Glass cleaner
  4. Tub and tile cleaner
  5. Your favorite cleaning towels -we use terry cloth
  6. A white/light duty scouring pad -to be used in your sink and tub. Choose one that won't scratch your shower's surround, especially if it is a plastic surround.
  7. A green/medium duty scouring pad -to be used in your toilet
  8. A pumice stone -for those rings in your toilet (if you have them) 

Step 1: Prep your bathroom for cleaning. You do this by taking out all the rugs, clearing off your counter tops and putting everything away. Get a basket or something that you can put everything from your shower in. This makes it easier to do the scrubbing needed without knocking things around. 

Step 2: Spray the shower with Tub and Tile Cleaner. A tip here is to get your shower walls wet first. This helps spread the tub and tile cleaner evenly over your shower walls. Make sure you read the directions and warnings on the bottle, wear gloves and open a window for ventilation. Tub and tile cleaners are acidic and may cause irritation to your skin. 

Step 3: Sprinkle the Abrasive Cleaner in your sink and toilet. No special tricks here!

Step 4: Dust the light above your mirror. I just take a dry towel and remove the dust from my lights. If it has been a while since you've done this, you may need to put more effort into it. If you do, then turn off your lights and lightly spray your towel with the glass cleaner. Make sure your lights are off and are not hot.

Step 5: Scrub the sink and toilet and rinse. Take your white/light duty scouring pad and scrub your sink. Take the scrubber to the faucet and handles as well. If you have hard water build up, you may need to put more effort into it but be sure not to scratch your finishes. Use warm water to rinse the abrasive cleaner down the drain. Use the green/medium scouring pad to scrub the inside of your toilet. You may also need to use the pumice stone to remove any hard water and rings. When you are done, flush the toilet to rinse.

Step 6: Wipe down and polish the sink and toilet areas. Spray your towel with glass cleaner and clean the mirror above your sink. Then use the disinfectant to clean your counter tops and to polish your sink and faucet. Now us disinfectant to clean the rest of your toilet including the top, seat, bowl, front and sides all the way down to where it bolts to the floor. I take the opportunity to wipe the floor around my toilet at this time while I'm down there. 

Step 7: The shower! The shower is the most difficult area to clean in any bathroom. You have already sprayed the shower walls with the tub and tile cleaner. It has had time to break down soap scum and hard water so now all you have to do is use the white/light duty scouring pad to scrub the walls. If the shower walls are dry, get the pad wet and scrub away. Make sure you are scrubbing real good in the areas where the water actually hits you walls when you shower as well as in, under and around the soap holder. Once you are happy with the walls, rinse them with warm water. After rinsing the walls, sprinkle your abrasive cleaner in the tub and use the same white/light duty pad to scrub your tub. Once scrubbed, rinse with warm water. Now use a clean, dry towel to dry your shower walls, polish the faucet, shower head and handles and to dry the tub. 

Step 8: Last but not least, the bathroom floor. You can use whatever you like to clean the floor but I find it easiest just to wipe it down with my disinfectant and a towel on my hands and knees. Of course if you have a huge bathroom you may want to use something that will be more convenient for you. 

Now that you have a nice clean bathroom you can put your items back in your shower, on your counter and put clean towels and rugs out. 

I suggest you give your bathroom a good cleaning at least every other week. 

Not sounding like a good time? Then give Clean Right Company a call and we'll do it for you. Along with the rest of your house! (509) 534-3343 or visit us online at www.cleanrightco.com

Friday, August 24, 2012

Getting ready for back to school


When I was a kid, back to school time was actually pretty exciting and, for most kids this is true. Its exciting because we get to go shopping for new clothes and new school supplies, we get to meet our new teachers and classmates and meet up with old friends. But this can also be a time of stress and anxiety, not only for kids, but for their parent's as well.

Here are some tips for making a smooth transition from summer to school for you and your kids.

  1. Begin having your kids go to bed at their 'school-time' bed time and have them begin to get up at the time they would need to in order to get ready for school. This teaches your kid to prepare, ahead of time, for expected changes in life. Don't let your kids stay up late right up to the day before they start school. This will set them up for getting to school late and lead them to believe waiting till the last minute to do things is OK. 
  2. Create an area of the home where your kids will do their homework and agree on a time of day that they will need to do their homework once school starts. Don't leave it up to your kids to get their homework done. Create an office for them so they can feel important. Finding them a place of their own to do their homework will give them a sense of pride and will make doing their homework more enjoyable.
  3. Discuss what they can expect from this year's school and take them there. Entering a new grade and especially entering a new school can be a major sense of anxiety for your kids. How many nightmares did you have (or still do have) about not being able to find your classes or remember your locker combination? Take your kid to the school and walk them through it. Show them their classroom, locker and even meet the teacher if possible. This will ease their anxiety for that first day. 
  4. Discuss what your kids can expect on how they will be getting to and from school. Perhaps this will be the first year that they will be riding the bus or walking themselves to school. Practice where they will meet the bus or the route they are to take to school. Also make sure they have your address and phone number memorized and know the rules on talking to strangers.
Make this school year easier for you and your kids by planning ahead. 

Friday, August 17, 2012

Final installment of "Keeping it Tidy..."

We've tackled the bathroom, the kitchen and the kid's rooms but what about the rest of the house?
In the cleaning industry, we call the remaining rooms of the house -'The Living Areas'. Named so because that's exactly what we do in these areas, or at least we should be. When areas of our home become too cluttered they become lifeless because we avoid spending time in them. Think about it, when's the last time you spent some quality time in your storage room?

We all do it. We collect things over the years, whether bought or, received as a gift, and we add it to the rest of our collection of things. Many items are sentimental and others are, what I call, "what if I need that?" items. Unfortunately, we run out of space and our homes become cramped, uncomfortable, and frankly -disorienting. There are so many 'things' in the room with us that we get distracted trying to make sense of everything.

So let's start de-cluttering our homes one area at a time.

  1. Kitchen Cupboards - Go through your cupboards and box up the items that you don't need or never use. Keep enough plates, bowls, cups, silverware and glasses to feed your family for a day's worth of meals but pack up the rest and donate them. Yes, you will need to do the dishes daily but, doing the dishes won't be as big of a chore as before because there won't be as many dishes to do! Also donate anything you haven't used in the past year. If you have muffin tins but never bake muffins, then donate them. This is one of those "but what if I need that?" moments... I have a hard time with this kind of stuff so here is my compromise. You could donate them and then purchase new ones if, and when, you actually are going to bake muffins or.... you could purchase a plastic tote and pack up these "what if I need that?" items. Of course this is the same with any other baking or cooking item. I would suggest getting a see-through tote so you can see what's in it without having to open the tote and make sure to give it a label -'Kitchen Wares'. You'll need a place to store this tote though. Don't just throw it in your 'storage room', which we'll get to in a moment, but put it somewhere you will be able to find when you actually do need one of these items.
  2. Closets - This is another hard one. We hang on to clothes that we want to wear again but, either because we never have the occasion or they don't actually fit us anymore, we most likely won't. So.... donate! Be honest with yourself. Are you really going to wear that? Some clothes we keep because we like the way it looks on the hanger but when we put it on, we don't like the way it looks on us. If that's the case, donate it! Also, if you've had that piece since high-school, it's time to let it go. Another compromise though! When you get rid of those clothes you can get new ones that you will actually wear and that actually fit you. (But only if you need them of course!) And what about towels? How many towels do you need? I would keep enough towels & wash clothes to get your family through a week. Again, you may need to do laundry more often but it won't be such a chore because you'll have less to wash, dry and fold. Coats are another item in closets we tend to collect too many of. You should have two for each season, a casual one and a formal one. And if you ski or, do some other outdoor activity which requires special clothing, you should keep just what you need of them as well. Shoes are probably the worst things to let go of. Especially for us ladies -we love our shoes. This is another "what if I need that?" item. But again, if you haven't worn them in a year or, when you do you curse yourself for it because your feet are killing you, get rid of them. And yes, you can replace them, but make sure you replace them with ones that are comfortable and that you can wear with more than one outfit. Try to consolidate. 
  3. Furnishings and Decoration- Yes even furniture can become cluttered or be the clutter themselves. If you have furniture that no one ever sits in or uses, then why have it? Also, keep the decorations on your furnishings to a minimum. It is difficult, I know, because we tend to display items that are sentimental to us. But, we can't display everything! When we display too much decor, it gets lost among all the rest. So that precious knick-knack you put on display won't even get noticed because no one can focus on any one thing with all that other stuff! Another tip, put holiday decorations away when the holiday is over! Get another see-through tote and pack up your holiday decor. Make a tote for each holiday and store it in your 'storage room' with the rest of your holiday decor so you can find it again next year. When you do break out the holiday decor, don't just display it with your every day decor. Neatly pack up the decorations you have out normally and let the holiday decor take center stage. Even do this with pictures of your friends and family. Have Christmas photos, in frames, with your Christmas decor and put them out in place of your ever day photos. This gives your home a fresh and festive feeling while you and your family can reminisce and discover hidden memories.
  4. Storage Room - Last but, not least, we are going to tackle the storage room. We all have one (or two) rooms in our homes that collect the things we don't use on a daily basis. So let's open the door and take a look around. Can you even find anything you might need in here? Can you actually walk around and get to things without tripping? If you answered no to either of these questions we need to get this room organized. Let's start by taking out the things we really don't need. A lot of times we use this room to store things because we just don't know what to do with them and really don't want, or need, them. So this is a great time to get rid of them -donate! Now we need to get more see-through totes and start organizing things into categories that we can pack up together. As before, we packed our holiday decorations into separate totes. Don't forget to label them! Now we will stack them in one area of the room which we will consider our holiday section. You would also put all of your wrapping paper and any other holiday type item in a tote and put in this section. Put all your crafting items in one area as well, putting each of your project tools in a separate, labeled tote. Do this with each of your categories and soon your storage room will actually be a functioning room again and you will actually be able to use the things you are storing in it!
So there you have it. A nice, neat and tidy home. Have fun de-cluttering, organizing and re-discovering your home!

A note: For those of you that don't want to donate your items, you could have a yard sale and earn some extra money for those new shoes! 

Written by Erica Jensen, President and Co-Owner of Clean Right Company of Spokane, WA. www.cleanrightco.com

Thursday, August 9, 2012

What about the fridge?

Now that we have a beautifully organized kitchen, thanks to the tips and tricks in last week's post -Let's Tackle that Kitchen http://cleanrightco.blogspot.com/2012/08/lets-tackle-that-kitchen.html, there is one more kitchen item that we dread to even look in.....

The refrigerator......


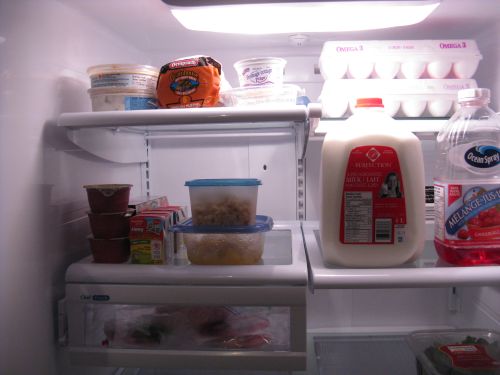
I love a neat and tidy refrigerator. When you open the door you can see everything it holds, at a glance. But in my years as a cleaning professional I have opened many a fridge that looks like a bomb went off in it. Therefore, I would like to share some tips and tricks that I use to keeping my fridge neat and clean.


  1. Put larger items towards the back and smaller items toward the front. This way, you can see everything your fridge holds without wading through it all. This will also ensure that some food items don't get "lost" at the back of the fridge which is a waste of money and would lead to a smelly situation.
  2. Keep like items together. I like to keep my dairy together, condiments together, etc.
  3. Put all condiments and sauces in the fridge doors.   Group your sauces, dressings and condiments and put them in separate areas of the door to your fridge.
  4. Use see through containers. By using containers you can see into, you will know what is in it without having to open the container. 
  5. Stack items.  Take the time to put like items together and stack them properly. This will also make it easier to find the items you need, when you need them.
  6. Clean it out often. Cleaning the fridge can be a chore if you don't do it often. I take a moment to wipe each shelf, crisper and cubbie just before I load my groceries into the fridge. I also go through and dispose of any expired items so I don't stack my fresh groceries on top of old. This keeps your fridge clean and you shouldn't need to do a 'deep clean' on it. If something gets spilled, wipe it up immediately  Waiting will only make it harder to clean.


Written by Erica Jensen, President of Clean Right Company, www.cleanrightco.com

Thursday, August 2, 2012

Let's tackle that kitchen!

This week in the series of making your home neat and tidy, we will tackle the kitchen.

Kitchens are the hub of the home. We gather there to chat, snack, sip coffee, cook and eat meals. We also, often times, use this area as a catch-all. Not only do we have our small appliances on the counter but we also throw the mail on the counter, toss the keys on the table and put odds and ends in the infamous junk drawer. If you're not careful, this room can quickly become a cluttered disaster that is now a place no one wants to sit and chat or even cook! Here are some great tips and ideas on how to wrangle your messy kitchen and make it the communal communication hub of the home.... again!

http://www.hgtv.com/kitchens/quick-tips-for-keeping-an-organized-kitchen/pictures/index.html

professional grade dream kitchen